
| 일 | 월 | 화 | 수 | 목 | 금 | 토 |
|---|---|---|---|---|---|---|
| 1 | 2 | 3 | 4 | 5 | 6 | 7 |
| 8 | 9 | 10 | 11 | 12 | 13 | 14 |
| 15 | 16 | 17 | 18 | 19 | 20 | 21 |
| 22 | 23 | 24 | 25 | 26 | 27 | 28 |
| 29 | 30 | 31 |
- 파이널프로젝트
- 상품수정
- html
- 쇼핑몰프로젝트
- 생활코딩
- 구매목록페이지
- 주문취소하기기능
- 국비프로젝트
- 상품삭제
- 상품목록보기
- 생활코딩javascript
- 상품명중복체크
- 스프링부트
- javascript
- jsp
- 주문조회페이지
- 유저삭제
- 권한체크
- 아이디중복체크
- vscode삭제
- 쇼핑몰주문취소
- ajax중복체크
- 마이페이지만들기
- DB공유하기
- 상품상세페이지
- 자바스크립트
- 쇼핑몰만들기
- 구매목록보기
- vscode폴더삭제
- 쇼핑몰홈페이지만들기
- Today
- Total
INTP의 멋대로 개발 세상
[📚상품 구매 사이트 3단계] 구매자 서버 만들기 - 3. header, footer, 로그인/로그아웃 구현 본문
[📚상품 구매 사이트 3단계] 구매자 서버 만들기 - 3. header, footer, 로그인/로그아웃 구현
인팁구름 2023. 4. 17. 05:10
더미 데이터가 있기 때문에 로그인 기능을 먼저 만들어 보자😏
나는 localhost:8080/ 주소를 로그인 화면으로 사용했다 (주소 입력하기 귀찮아서..)
📺 화면 구현📺
로그인 화면

<%@ page language="java" contentType="text/html; charset=UTF-8" pageEncoding="UTF-8" %>
    <%@ include file="../layout/header.jsp" %>

        <div class="container">
            <form action="/login" method="post" name="form">
                <div class="mb-3 mt-3">
                    <input type="text" class="form-control" placeholder="username" name="userName" value="ssar" />
                </div>
                <div class="mb-3">
                    <input type="password" class="form-control" placeholder="password" name="userPassword" value="1234"/>
                </div>
                <button type="submit" class="btn btn-primary">
                    로그인
                </button>

            </form>
            <button onclick="location.href='/joinForm'" ; class="btn btn-secondary mt-3">
                아직 회원이 아니신가요?
            </button>
        </div>

        <%@ include file="../layout/footer.jsp" %>
Header
헤더는 로그인 했을 때와 안 했을 때 차이를 두었다.


<%@ page language="java" contentType="text/html; charset=UTF-8" pageEncoding="UTF-8" %>
    <%@ taglib prefix="c" uri="http://java.sun.com/jsp/jstl/core" %>
        <!DOCTYPE html>
        <html lang="en">

        <head>
            <title>Product</title>
            <meta charset="utf-8" />
            <meta name="viewport" content="width=device-width, initial-scale=1" />
            <link href="https://cdn.jsdelivr.net/npm/bootstrap@5.1.3/dist/css/bootstrap.min.css" rel="stylesheet" />
            <script src="https://ajax.googleapis.com/ajax/libs/jquery/3.6.0/jquery.min.js"></script>
            <script src="https://cdn.jsdelivr.net/npm/bootstrap@5.1.3/dist/js/bootstrap.bundle.min.js"></script>
            <link href="https://cdnjs.cloudflare.com/ajax/libs/font-awesome/6.2.0/css/all.min.css" rel="stylesheet" />
            <link href="https://cdn.jsdelivr.net/npm/summernote@0.8.18/dist/summernote-lite.min.css" rel="stylesheet" />
            <script src="https://cdn.jsdelivr.net/npm/summernote@0.8.18/dist/summernote-lite.min.js"></script>
        </head>
        <style>
            .gitlink {
                text-decoration-line: none;
                color: rgb(255, 105, 138);
                font-weight: bolder;
                background-color: rgb(255, 228, 154);
            }

            .center {
                display: flex;
                justify-content: center;
            }
        </style>

        <body>
            <nav class="navbar navbar-expand-sm bg-dark navbar-dark">
                <div class="container-fluid">
                    <h3 style="color: white;">🤍쇼핑몰🛒</h3>
                    <button class="navbar-toggler" type="button" data-bs-toggle="collapse"
                        data-bs-target="#collapsibleNavbar">
                        <span class="navbar-toggler-icon"></span>
                    </button>

                    <%-- 로그인 안 했을 때 헤더 --%>
                    <c:choose>
                       <c:when test="${principal == null}">
                    <div class="collapse navbar-collapse" id="collapsibleNavbar">
                        <ul class="navbar-nav">
                            <li class="nav-item">
                                <a class="nav-link" href="/product">상품목록</a>
                            </li>
                            <li class="nav-item">
                                <a class="nav-link" href="/">로그인</a>
                            </li>
                        </ul>
                    </div>
                       </c:when>

                    <%-- 로그인 했을 때 헤더 --%>

                       <c:otherwise>
                       <div class="collapse navbar-collapse" id="collapsibleNavbar">
                        <ul class="navbar-nav">
                            <li class="nav-item">
                                <a class="nav-link" href="/product">상품목록</a>
                            </li>
                            <li class="nav-item">
                                <a class="nav-link" href="/orderListForm/${principal.userId}">주문확인</a>
                            </li>
                            <li class="nav-item">
                                <a class="nav-link" href="/logout">로그아웃</a>
                            </li>
                        </ul>
                    </div>
                       </c:otherwise>
                    </c:choose>
                </div>
            </nav>
        </body>

        </html>
Footer
심심해서(?) 푸터에
해당 프로젝트 깃허브 링크를 걸어놨다

<%@ page language="java" contentType="text/html; charset=UTF-8" pageEncoding="UTF-8" %>
    <br />
    <hr />
    <div class="jumbotron text-center" style="margin-bottom: 0">
        <p>👾 Created by <a class="gitlink"
                href="https://github.com/JungminK1m/Springboot-Product-Study-Buyer">JungminK1m</a></p>
        <p>📞 010-1234-5678</p>
        <p>🏴 부산 부산진구 XX동</p>
    </div>
    </body>

    </html>
Controller
@Controller
public class UserController {

    @Autowired
    private HttpSession session;

    @Autowired
    private UserRepository userRepository;

    // 메인페이지가 로그인 페이지
    @GetMapping("/")
    public String loginForm() {
        return "user/loginForm";
    }

    @PostMapping("/login")
    public String login(LoginDto loginDto) {
        User userPS = userRepository.findByUsernameAndPassword(loginDto);

        if (userPS != null) {
            session.setAttribute("principal", userPS);

            //System.out.println("username : " + userPS.getUserName());
            //System.out.println("password : " + userPS.getUserPassword());

            //System.out.println("로그인 됨");

            return "redirect:/product";
        } else {

            //System.out.println("로그인 안 됨");

            throw new CustomException("로그인에 실패하였습니다.", HttpStatus.BAD_REQUEST);
        }

      }

     @GetMapping("/logout")
     public String logout() {
        session.invalidate();
        return "redirect:/";
      }
    }
CustomException 만들기
로그인 등 기능을 만들 때, 실패하거나 했을 때 창을 띄워주고 싶은데,
자바스크립트로 만들자니 귀찮고,
그냥 redirect로만 리턴하자니 이게 제대로 된 건지 안 된 건지 알아보기 힘들다면
나만의 예외처리 기능을 만들자!

package shop.mtcoding.productapp_buyer.handler.ex;

import org.springframework.http.HttpStatus;

public class CustomException extends RuntimeException {

    // 상태코드
    private HttpStatus status;

    // 생성자
    public CustomException(String message, HttpStatus status) {
        super(message);
        this.status = status;
    }
}
모든 Exception들은 RuntimeException을 상속한다!
package shop.mtcoding.productapp_buyer.handler;

import org.springframework.web.bind.annotation.ExceptionHandler;
import org.springframework.web.bind.annotation.RestControllerAdvice;
import shop.mtcoding.productapp_buyer.handler.ex.CustomException;

@RestControllerAdvice
public class CustomExceptionHandler {

    // 무조건 데이터를 응답할 거기 때문에 RestController
    // 자바 스크립트를 응답
    // 어노테이션 ()안에 타입을 적어줘야 함
    // 런타임익셉션 - 모든 익셉션이 다 여기로 올 거임

    // exception터지면 다 여기로 올 거임! 무조건 뒤로가기

    @ExceptionHandler(CustomException.class)
    public String basicException(Exception e) {
        StringBuilder sb = new StringBuilder();
        sb.append("<script>");
        sb.append("alert('" + e.getMessage() + "');");
        sb.append("history.back();");
        sb.append("</script>");
        return sb.toString();
    }

    // Dto를 응답

}
예외처리 메서드를 쓰면 alert창에 원하는 메시지를 사용할 수 있고
alert 창을 닫으면 Exception이 생기기 직전으로 돌아간다(back)
예시)


LoginDto 만들기
package shop.mtcoding.productapp_buyer.dto.user;

import lombok.Getter;
import lombok.Setter;

@Getter
@Setter
public class LoginDto {

    private String userName;
    private String userPassword;
}
모델과 다르게 실제 화면에 사용하는 값을 DTO로 만들었다.
🎤 코드 리뷰 🎤

view에 있는 로그인 페이지를 컨트롤러와 연결시켜 주었다.
localhost:8000/ 을 입력하면 페이지가 뿅! 뜬다
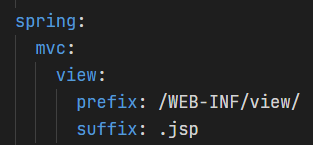
loginForm 페이지는 내가 user 폴더에 넣어놨다.
yml에 설정된 view\ 이후의 경로이기 때문에 return 값에 적어 주어야 한다.


화면에 입력된 username과 password (방금 만들었던 DTO)가 login 메서드의 매개변수로 들어온다.
그럼 그걸 findByUsernameAndPassword 메서드에 넣어서
DB에 username과 password가 일치하는 값이 있는 지 찾도록 한다.
그리고 그 찾은 결과를 userPS라는 변수에 저장한다.

UserRepository에 있는 findByUsernameAndPassword 를 찾아가서
입력된 값을 넣는다.
반환은 User(모델) 타입으로 할 것이다.

그 값이 xml로 가서 DB에 접근한다.
입력한 #{userName} , #{userPassword}
와
DB 테이블에 있는 user_name과 user_password를 비교할 것이다

로그인 한 유저의 정보를 세션에 담아야하기 때문에
HttpSession을 Autowired 해 준다.
이름은 너무 길어서 session이라고 정했다.

DB에서 찾아온 값을 userPS로 담았다.
DB값과 입력한 DTO 값이 일치하다면
세션에 "principal" 이라는 이름으로 유저의 정보를 저장할 것이다
( != null 은 null이 아닌 것이니까 해당 유저가 존재한다는 뜻)
세션에 정보를 저장한 뒤 product 페이지로 보낸다 (상품 목록 페이지)

userPS가 존재하지 않다면,
위에서 만들었던 CustomException을 발동시켜 로그인을 막는다.
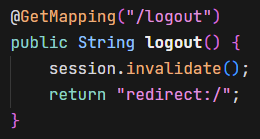
로그아웃이다.
session.invalidate();를 써주면 현재 세션이 삭제된다.
로그아웃할 때 돌아갈 페이지를 redirect 해 주었다.
📊 결과 확인 📊


'KDT 풀스택 국비 과정 > 파이널 프로젝트(미니)' 카테고리의 다른 글
| [📚상품 구매 사이트 3단계] 구매자 서버 만들기 - 5. 상품 목록보기/상세보기 만들기 (1) | 2023.04.17 |
|---|---|
| [📚상품 구매 사이트 3단계] 구매자 서버 만들기 - 4. 회원가입 기능 만들기 (0) | 2023.04.17 |
| [📚상품 구매 사이트 3단계] 구매자 서버 만들기 - 2. 모델링 (model, Repository, xml 생성) (0) | 2023.04.17 |
| [📚상품 구매 사이트 3단계] 구매자 서버 만들기 - 1. 테이블, 더미데이터, view 생성&연결 (0) | 2023.04.12 |
| [📚상품 구매 사이트 3단계] 스프링부트 ↔ MyBatis ↔ MySQL 연동하기 (1) | 2023.04.12 |


